You begin restrained. Inspect the desk lamp and the Progress Notes on the table. Check the blood stains under the couch and the medical equipment nearby. Exit through the only available door, turn right down the hallway. Flip the switch midway to illuminate the far corridor end. Rooms 201 and 202 are locked — you need the Angel Key first.
以被束缚状态开始。检查台灯和桌上的《进度记录》,检查沙发下血迹和医疗设备。从唯一可用的门离开,右转进入走廊。中途扳下开关点亮走廊远端灯光。201和202号房锁着——需先取得天使钥匙。
Head upstairs. The Rec Room has a pool table — the Wire Cutters are on it (grab them, they're used later). Angel Key is in the dresser drawer in the room at the corridor end. Return to Room 201: handgun ammo and an empty tape tin inside. Under the 2F cabinet on the right: more handgun ammo. The left cabinet holds a lockable box — note it for later.
上楼。休闲室台球桌上有铁丝剪(拿走,后续使用)。走廊尽头房间梳妆台抽屉里有天使钥匙。返回201号房:内有手枪弹药和空胶卷盒。2楼右侧橱柜下有更多手枪弹药,左侧橱柜有可锁箱子——记住位置。
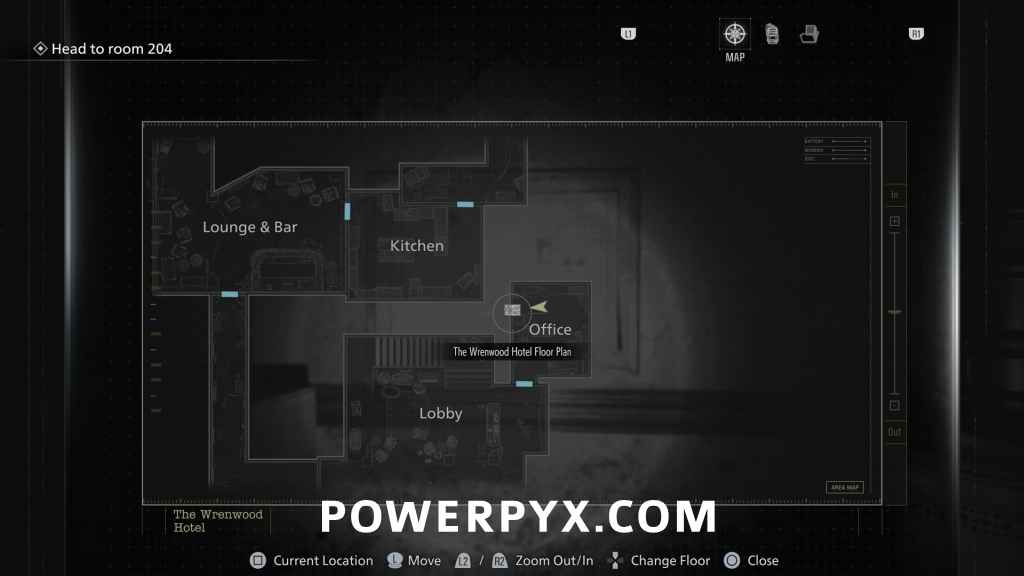
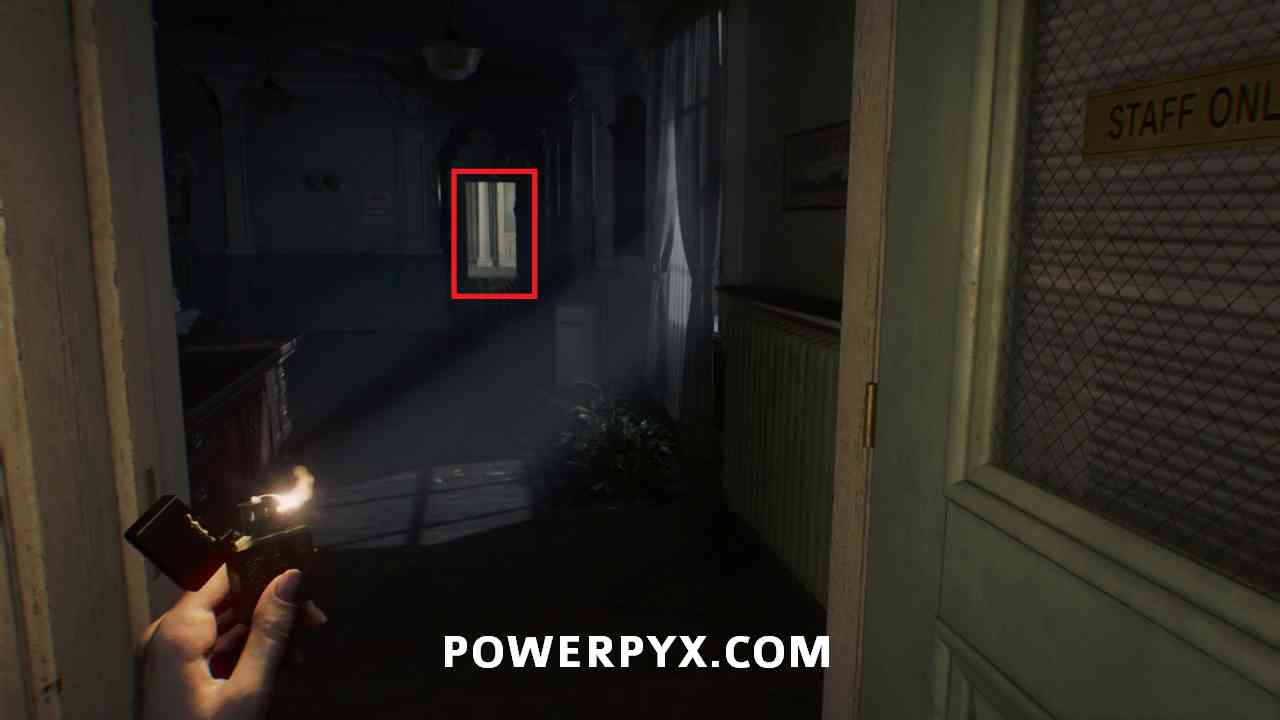
Old Key is in the lounge/bar area — found after going through the kitchen in a very dark room. IMPORTANT: Equip your flashlight before entering — it does not turn on automatically. Use the Old Key to open the lobby door with stairs leading up. Find the Hotel Map on the office wall. Check the bar counter photo (examine the back) — this triggers Grace's memory flashback.
旧钥匙在休息区/酒吧——穿过厨房后的极暗房间内。重要:进入前装备手电筒——不会自动亮起。用旧钥匙开大厅通往楼梯的门。办公室墙上有旅馆地图。检查吧台照片(翻转背面)——触发 Grace 的记忆回闪。
In Grace's memory, you see a woman hide a folder behind a painting on the 1F. Return downstairs, move the luggage cart blocking the wall, then interact with the painting. Retrieve Alyssa's Diary and the mysterious Disk. During the escape, Grace's sleeve catches on the cart — hold the button to break free while dodging the officer's shots. Emergency Exit Key auto-picked up from floor. Use it on the 2F exit door to the right.
在 Grace 的记忆中,看到一名女性将文件夹藏在1楼油画后。下楼,移开挡住墙壁的行李车,与油画互动。取得 Alyssa 的日记和神秘磁盘。逃跑时 Grace 的袖子被行李车钩住——按住按键挣脱,同时躲避警察的枪击。从地板上自动拾起紧急出口钥匙,在2楼右侧出口门使用。
You take control of Leon after spotting Victor Gideon carrying Grace. Move forward to pick up Tracking Module #1 on the right. Continue to the intersection and find Tracking Module #2 on the right side. This section introduces Leon's kick-and-finisher loop: shoot or kick to stagger a zombie, then press the finisher prompt for a hatchet kill. Ammo is generous here — use this to get comfortable with the system.
目击 Victor Gideon 带走 Grace 后控制 Leon。向前走,右侧拾取追踪模块 #1。继续到十字路口,右侧找到追踪模块 #2。本段落介绍 Leon 的踢击+处决循环:射击或踢击令丧尸踉跄,再按处决提示用斧头击杀。弹药充足——利用此处熟悉战斗系统。
Slow, easy to bypass. Two handgun shots to the head kill reliably. In Grace sections, bypass whenever possible — every bullet matters later. If grabbed, shake the stick or alternate buttons to break free before taking bite damage.
移动缓慢,容易绕行。两发手枪爆头可靠击杀。Grace 段优先绕行,每发子弹都有价值。被抓住时左右摇杆或交替按键挣脱,避免受到咬伤伤害。
Faster than zombies and equipped with batons. Leon's kick staggers them effectively — kick once to stagger, then move in for the hatchet finisher. No need to waste pistol ammo here. These enemies drop small amounts of Credits on death.
比丧尸快,携带警棍。Leon 的踢击能有效令其踉跄——踢一次踉跄后近身执行斧头处决。不必浪费手枪弹药。这些敌人死亡时掉落少量 Credits。
- Angel Key — Dresser drawer, upper 2F corridor. Opens Room 201 for ammo.
- 天使钥匙 — 2楼走廊尽头梳妆台抽屉。开启201号房获取弹药。
- Old Key — Dark bar/lounge area after kitchen. Opens the lobby staircase door.
- 旧钥匙 — 穿过厨房后的酒吧区。开启大厅楼梯门。
- Wire Cutters — Pool table, Rec Room 2F. Used in a later section of the game.
- 铁丝剪 — 2楼休闲室台球桌。用于游戏后续区段。
- Emergency Exit Key — Auto-pickup during escape sequence. Opens 2F exit door.
- 紧急出口钥匙 — 逃跑过程中自动拾取。开启2楼出口门。
- File #2: Wrenwood City Guide — City map on the right while walking the street.
- 档案 #2:伍德兰市指南 — 沿街行走时右侧的城市地图。
- File #3: Hotel Pamphlet — On the floor after opening the lobby door with Old Key.
- 档案 #3:旅馆宣传册 — 用旧钥匙开大厅门后,地板上。
- File #4: Notice of Closure — Blue drawer behind the front desk in the office.
- 档案 #4:关闭通知 — 办公室前台后的蓝色抽屉。
- File #5: Alyssa's Journal — Automatic from story (painting interaction). Cannot be missed.
- 档案 #5:Alyssa 的日记 — 剧情自动获取(油画互动)。不可错过。
Grace wakes up in the Care Center. Investigate the room thoroughly — check the item box on the wall (this is how you store extra items between areas). The reception desk has the first Care Center map. Use the Touchpad / Map button to view it. Check the board near the entrance for files. The Parlor upgrade shop opens here for Grace — visit it immediately to buy Attaché Case upgrades with any Antique Coins you've found.
Grace 在疗养院中苏醒。彻底检查房间——查看墙上的道具箱(这是区域间存放多余道具的方式)。接待台有第一份疗养院地图。按触控板/地图键查看。入口附近的公告板上有档案。Grace 专属的 Parlor 升级商店在此开放——立即前往,用任何已收集的古董钱币购买背包扩容升级。
The Care Center's corridors are a maze of locked doors requiring different keys and items. The Joint Plug is your most important recurring item — it activates door mechanisms throughout the building. Explore methodically: read every file you find as they contain codes and clues for locked safes and rooms. Several rooms require Moon Quartz to unlock — collect every piece you find.
疗养院走廊是一个需要不同钥匙和道具才能解锁的迷宫。关节插头是最重要的反复出现道具——它激活整栋楼的门控机构。系统化探索:阅读每份找到的档案,它们包含锁定保险箱和房间的密码与线索。部分房间需要月石英开锁——收集每一块找到的月石英。
The Girl first appears during a scripted event. She is enormous and cannot be harmed by any weapon. She detects Grace through sound (footsteps, gunshots, breaking objects) and movement. When she appears: stop moving, crouch, hold your breath. If spotted, sprint to the nearest locker or bed and hide. The Requiem item temporarily stuns her for ~8 seconds — use it to create distance or reach the next area.
The Girl 在特定事件中首次出现。她体型巨大,任何武器都无法伤害她。她通过声音(脚步声、枪声、打破物品)和动作感知 Grace。她出现时:停止移动,蹲下,屏住呼吸。被发现后冲向最近的储物柜或床底躲藏。安魂曲道具可短暂震慑她约8秒——利用震慑创造距离或到达下一区域。
The piano room has several zombies — use the axe in stealth to conserve ammo. A "singer" zombie in the hallway cannot be taken out stealthily; use whatever weapon you have. Opening the shortcut here as Grace lets Leon use it later. The archive room door is open in the office area — important files inside. Check the attic before leaving 2F: wooden cabinet yields shotgun shells, a tracking module, and a file.
钢琴室有几只丧尸——使用斧头潜行击杀节省弹药。走廊里的"歌者"丧尸无法潜行击杀,使用任何可用武器。以 Grace 身份在此开启捷径后,Leon 之后可以通过。办公区的档案室门已开——里面有重要档案。离开2楼前检查阁楼:木柜可得散弹枪弹药、追踪模块和一份档案。
The Bar and Lounge safe is in a side office accessed from the Furnace room. The combination is obtained from a file in the area — read every document. The safe contains the Raccoon Roundup Map, which marks all 25 Mr. Raccoon locations on your map permanently. This is arguably the most valuable collectible in the entire game for completionists.
吧台休息区保险箱在从炉子房进入的侧室里。密码来自区域内的一份档案——阅读每份文件。保险箱内有《浣熊玩偶分布图》,永久在地图上标注全部25个浣熊玩偶位置。对于全收集玩家来说,这可以说是整个游戏中价值最高的可收集物品。
Leon's perimeter route through Rhodes Hill is more combat-focused. Engage enemies aggressively — ammo is abundant compared to Grace's sections. At the end of Leon's Rhodes Hill Care Center section, a small horde sequence appears. Fight through it to unlock an achievement. Use this opportunity to farm Credits for Body Armor upgrades at the Parlor (prioritise all three tiers: total 85,000 Credits).
Leon 穿越罗兹山的外围路线更注重战斗。积极交战——与 Grace 段相比弹药充足。Leon 罗兹山疗养院段结尾会出现一小波丧尸群,打通关可解锁成就。利用此机会在 Parlor 刷取 Credits 购买防弹衣升级(优先全三级:共 85,000 Credits)。
- Attaché Case Upgrade ×2 — Increases Grace's inventory slots. Most critical — do this first.
- 背包扩容 ×2 — 增加 Grace 的背包格数。最关键——优先购买。
- Blood Collector Capacity+ — Allows more microsamples per trip between workbenches.
- 血液采集器容量+ — 每次工作台之间可携带更多微样本。
- Handgun Damage+ — More headshot reliability on armoured variants.
- 手枪伤害+ — 对装甲变种更可靠地爆头击杀。
- Health Upgrade — Useful for Insanity difficulty; optional on Normal.
- 生命值升级 — 狂乱难度有用,普通难度可选。
- Joint Plug #1 — Found in the Workshop area. Unlocks multiple rooms across the building.
- 关节插头 #1 — 在工坊区域找到。解锁整栋楼的多处房间。
- Moon Quartz (×multiple) — Recurring item used to unlock specific doors. Collect every piece.
- 月石英(×多个) — 反复出现的道具,用于解锁特定门。收集每一块。
- Requiem Item — Found in a locked display case in the upper hallway. Stuns The Girl temporarily.
- 安魂曲道具 — 在上层走廊的锁定展示柜中找到。短暂震慑 The Girl。
- ⚠️ FILE WARNING: Files marked with a "!" on the map disappear after certain story triggers. Collect all upper floor files before descending to the basement in Chapter 3.
- ⚠️ 档案警告:地图上标有"!"的档案会在特定剧情触发后消失。在第3章下地下室前收集所有上层档案。
The basement is the darkest area in the game — keep your flashlight on at all times. The flooded sections of floor create noise when walked on; switch to walking speed to minimise sound. Caged zombies line the walls: they cannot leave their cells but have a grabbing reach. Walk along the centre of corridors, never too close to the bars. If grabbed, alternate the movement controls rapidly to break free.
地下室是游戏中最暗的区域——始终保持手电筒开启。被淹没的地板区域行走会产生噪音;切换为步行速度以最小化声音。牢笼丧尸排列在墙边:它们无法离开牢房,但有抓取范围。沿走廊中央行走,绝不靠近铁栏杆。被抓住时快速交替移动控制杆挣脱。
The Workshop is accessible via a crawl vent or by inserting a plug at a nearby door. Joint Plug #2 is next to the furnace (near the forklift). This single item unlocks multiple rooms across the basement including the Bunkroom (Mr. Raccoon #8) and the Security Room area. Also grab the File: Technician's Note from the Workshop table — it references the Boiler Room puzzle.
工坊可通过爬行通风口或在附近门插入插头进入。关节插头 #2 在炉子旁(叉车附近)。这单个道具可解锁地下室多处房间,包括宿舍区(浣熊玩偶 #8)和安全室区域。同时从工坊桌上取走《技工注记》档案——它涉及锅炉房谜题。
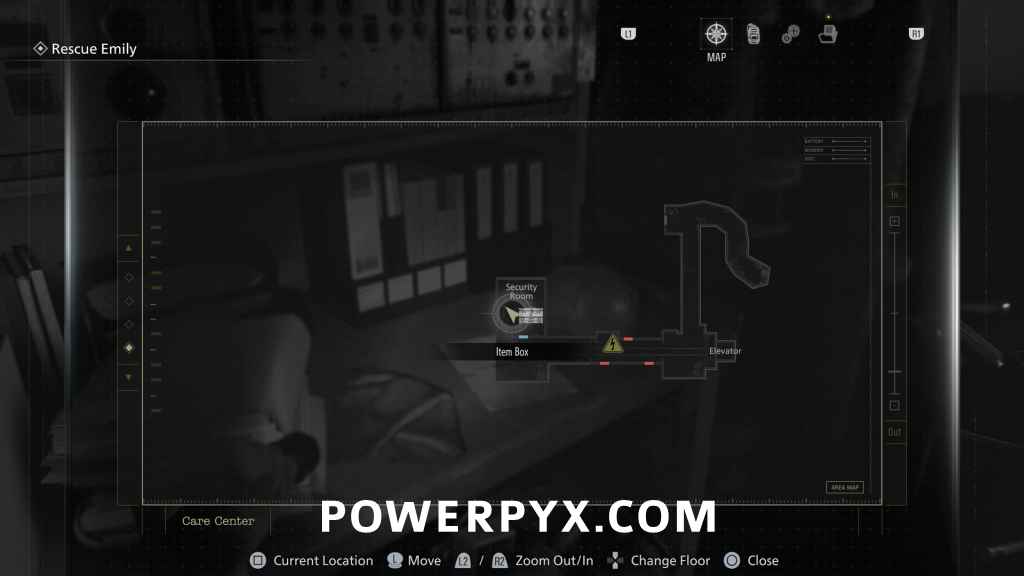
Emily is imprisoned in the deepest part of the basement cell block. To reach her, three sequential puzzles must be completed: (1) activate the power junction box, (2) redirect the water flow using the valve wheels in the correct sequence, (3) insert the recovered fuse into the control panel near her cell. The exact solutions are hinted at in files found throughout the basement — read them carefully.
Emily 被关押在地下室牢房区最深处。要到达她那里,必须完成三个连续谜题:(1) 激活配电箱,(2) 用阀门轮以正确顺序改变水流,(3) 在她牢房附近的控制面板插入找到的保险丝。精确解法在整个地下室的档案中有提示——仔细阅读。
Leon takes an elevated position overlooking the courtyard while Grace is in the basement. The sniper rifle allows one-shot headshots on all visible enemies. Don't conserve rifle ammo during this sequence — you have plenty. Clear all enemies systematically: start with those closest to the basement entry doors, then work outward. The sequence ends automatically once all courtyard enemies are eliminated.
Grace 在地下室时,Leon 占据俯瞰庭院的高处阵地。狙击步枪允许对所有可见敌人一枪爆头。在这个序列中不要节省步枪弹药——储备充足。系统性清除所有敌人:从最靠近地下室入口门的开始,然后向外推进。消灭庭院所有敌人后序列自动结束。
Once Emily joins Grace, she follows automatically but creates additional footstep noise. Always use walking speed during escort — never sprint unless The Girl is nearby. Emily is blind and cannot detect enemies, so she won't slow down near threats. Plan your route to avoid noisy floor sections. The Hemolytic Injector becomes craftable after Emily explains the medical equipment she witnessed.
Emily 加入 Grace 后会自动跟随,但会产生额外的脚步声。护送期间始终使用步行速度——除非 The Girl 在附近,否则不要冲刺。Emily 是盲人,无法察觉敌人,所以她不会在威胁附近放慢速度。规划路线以避开嘈杂的地板区域。Emily 讲述她目睹的医疗设备后,溶血注射器变得可合成。
After activating the Joint Plug at the Workshop, proceed to the Furnace room (central room). In the next room, a side office on the right contains Safe #3. The combination is from File #33: Basement Safe Code (obtained as Leon). Casual/Standard: Right 60 – Left 40 – Right 80. Insanity: Left 70 – Right 50 – Left 20. Contains high-value weapon parts.
在工坊激活关节插头后,前往炉子房(中央房间)。下一个房间右侧的侧室有保险箱 #3。密码来自档案 #33:地下室保险箱密码(由 Leon 获取)。普通/标准:右60–左40–右80。狂乱:左70–右50–左20。内含高价值武器零件。
- Joint Plug #2 — Workshop furnace (near forklift). Critical — unlocks Bunkroom, Security Room, and more.
- 关节插头 #2 — 工坊炉子旁(叉车附近)。关键——解锁宿舍区、安全室等多处。
- Replacement Fuse — Found in the basement utility area. Required to power Emily's cell door mechanism.
- 替换保险丝 — 在地下室设备区找到。需要用于给 Emily 牢房门机构供电。
- File #33: Basement Safe Code — Obtained by Leon. Gives the combination for Safe #3 in the Furnace room.
- 档案 #33:地下室保险箱密码 — 由 Leon 获取。给出炉子房保险箱 #3 的密码。
- File: Subject 170 Record — Hidden lab. Move the stretcher in the Collection & Testing room to reveal it. Key Elpis backstory.
- 档案:Subject 170 档案 — 隐藏实验室。移动采集与测试室的担架来揭露它。Elpis 背景关键档案。
- File: Unlocking the Cells — Bulletin board above the electrical console, east end of holding cells.
- 档案:解锁牢房 — 关押区东端电气控制台上方的公告栏。
- File: Operation to Eliminate "The Girl" — Table left of the monitors in the Security Room.
- 档案:消灭"女孩"的行动 — 安全室监控器左侧的桌子上。
Leon fights through the Water Treatment Plant while Grace heads for the helipad. This is the highest-density combat section in Rhodes Hill. Use the hatchet finisher loop aggressively — kick to stagger, sharpen and finisher for maximum Credits per kill. The plant's storage rooms contain Weapon Parts: check every locked cabinet (use the Lockpick on small drawers). Plant 43 Seedlings appear here for the first time — use incendiary grenades on them.
Leon 穿越水处理厂时 Grace 前往直升机坪。这是罗兹山密度最高的战斗区段。积极使用斧头处决循环——踢击踉跄,磨刃后处决,每次击杀获得最多 Credits。工厂储物间有武器零件:检查每个锁定橱柜(对小抽屉使用开锁工具)。Plant 43 幼苗在此首次出现——对其使用燃烧弹。
To activate the helipad, Grace needs the helicopter key locked in a cabinet on the Admin Building 3F. Access to 3F requires the Staff Pass, which is found on the 2F admin corridor. Once you have the Staff Pass, go to 3F and open the key cabinet. The path back to the helipad requires careful navigation — The Girl may make a final appearance in this section.
要激活直升机坪,Grace 需要锁在行政楼3楼橱柜里的直升机钥匙。进入3楼需要员工通行证,在2楼行政走廊找到。取得员工通行证后,前往3楼打开钥匙橱柜。返回直升机坪的路程需要谨慎导航——The Girl 可能在本区段最后一次出现。
Grace and Leon's narrative lines converge at the helipad. Both characters experience the same event from their own perspectives simultaneously. Leon must hold off waves of enemies at the perimeter while Grace activates the helicopter. A story event occurs that permanently changes the direction of the narrative — prepare yourself.
Grace 和 Leon 的叙事线在直升机坪汇合。两个角色同时从各自视角经历同一事件。Leon 必须在外围抵挡一波又一波的敌人,同时 Grace 激活直升机。一个剧情事件的发生将永久改变叙事方向——做好心理准备。
Triggering the helipad cutscene permanently locks you out of ALL Rhodes Hill content. This means: all Mr. Raccoon statues (#2–#11), all remaining files, Safes #1–#3, and any Parlor upgrades you haven't purchased. Do a thorough checklist sweep before activating the helicopter. Create a manual save specifically labeled "Pre-helipad" as insurance.
触发直升机坪过场动画将永久锁定所有罗兹山内容的访问权限。这意味着:所有浣熊玩偶(#2–#11)、所有剩余档案、保险箱 #1–#3,以及任何未购买的 Parlor 升级。激活直升机前做一次彻底的清单检查。专门创建一个标记为"直升机坪前"的手动存档作为保险。
- Mr. Raccoons #2–#11 all found ✓
- 浣熊玩偶 #2–#11 全部找到 ✓
- Safe #1 (Bar & Lounge) opened — contains Raccoon Roundup Map ✓
- 保险箱 #1(吧台休息区)已开——含浣熊分布图 ✓
- Safe #2 (Examination Room) opened ✓
- 保险箱 #2(检查室)已开 ✓
- Safe #3 (Furnace Room) opened — R60-L40-R80 ✓
- 保险箱 #3(炉子房)已开 — 右60-左40-右80 ✓
- All Rhodes Hill files collected (aim for ~40) ✓
- 所有罗兹山档案已收集(目标约40份)✓
- Parlor upgrades purchased with all Antique Coins ✓
- 所有古董钱币已在 Parlor 用于升级 ✓
- Leon: Body Armor Level 3 purchased (85,000 Credits) ✓
- Leon:防弹衣三级已购买(85,000 Credits)✓
The open streets of East Raccoon are a dramatic shift from the claustrophobic Care Center. Enemy density is high: BSAA operatives use tactical cover and armour (weak to sustained fire or hatchet finishers after a kick). Three Detonator Components are scattered across East Raccoon sub-areas — all are required to blow open the blockade gate to the city centre. Their locations are marked on files found in the BSAA Central Camp.
浣熊市东区开阔的街道与令人窒息的疗养院形成鲜明对比。敌人密度高:BSAA 特工使用战术掩护和装甲(持续射击或踢击后斧头处决有效)。三个起爆器零件散布于东区各子区域——全部需要用于炸开通往市中心的封锁大门。它们的位置在 BSAA 中央营地找到的档案中有标注。
There are 9 Plant 43 Seedlings total in the entire game — most are in East Raccoon. Kill at least 8 of the 9 to unlock the "Exterminator" achievement. They appear at: (1–2) during the motorcycle chase sequence (auto-hit if on correct path), (3–7) scattered across East Raccoon streets and alleys, (8–9) near the BSAA camp and the blockade gate. Use incendiary grenades for the fastest kills — each seedling takes 1 direct grenade hit.
整个游戏共有9株 Plant 43 幼苗——大多数在浣熊市东区。击杀9株中的至少8株可解锁"灭虫者"成就。出现位置:(1-2) 摩托追逐序列中(正确路径自动命中),(3-7) 散布于东区街道和小巷,(8-9) 靠近 BSAA 营地和封锁大门。使用燃烧弹最快击杀——每株幼苗承受1枚直接手雷击中即死。
A cinematic set-piece: no aiming required. Follow QTE prompts to dodge debris, incoming vehicles, and enemy attacks. Two Plant 43 Seedlings appear during the chase — they are automatically hit if you follow the correct QTE path. The sequence ends at the BSAA Central Camp. This is a resupply hub: check all supply crates, speak to the merchant, and restock before the Titan Spinner boss fight ahead.
电影化场景:无需瞄准。跟随 QTE 提示闪避碎片、来袭车辆和敌人攻击。追逐过程中出现两株 Plant 43 幼苗——若遵循正确的 QTE 路径会自动命中。序列在 BSAA 中央营地结束。这是补给枢纽:检查所有补给箱,与商人交谈,并在即将到来的 Titan Spinner Boss 战前补充储备。
Before entering the arena: ensure you have at least 6 Incendiary Grenades (craft from materials if needed), the Rifle or Requiem Rifle loaded, and Body Armor Level 3 equipped. The arena has several abandoned vehicles that can be used as cover from web attacks. The glowing abdominal gland is the ONLY effective target — all other hits deal 80% reduced damage. Damage to the gland triggers a stagger that opens a counterattack window.
进入战场前:确保至少有6枚燃烧弹(如需可从材料合成)、步枪或 Requiem 步枪已装填,以及三级防弹衣已装备。战场有几辆废弃车辆可用作躲避蜘蛛网攻击的掩体。发光腹部腺体是唯一有效目标——其他所有命中伤害降低80%。对腺体造成伤害会触发硬直,开启反击窗口。
- Detonator Component ×3 — Marked on files at BSAA camp. All required to open blockade gate.
- 起爆器零件 ×3 — 在 BSAA 营地的档案中标注。全部需要用于开放封锁大门。
- Safe #4 — Abandoned East Precinct. Combination from files found nearby. Contains premium weapon parts.
- 保险箱 #4 — 东区废弃警局。密码来自附近档案。内含高级武器零件。
- Incendiary Grenades — Stock at least 6 before Titan Spinner. Craft any shortfall from materials at the BSAA camp workbench.
- 燃烧弹 — Titan Spinner 战前备足至少6枚。在 BSAA 营地工作台用材料合成不足的数量。
Leon approaches the RPD through surrounding streets. Mature Plant 43 vines block several routes — they require fire or explosives to clear the root systems (the roots must be destroyed to open the path, the body alone is not enough). BSAA operatives are at their most organised here: they use suppressive fire, flanking patterns, and will call for backup if combat is prolonged. Prioritise eliminating snipers on elevated positions first.
Leon 穿越周边街道接近 RPD。成体 Plant 43 藤蔓封锁多条路线——需要火焰或爆炸物清除根系(必须摧毁根系才能开路,仅攻击本体不够)。BSAA 特工在这里组织最为严密:使用压制射击、包抄模式,战斗延长时会呼叫援军。优先消灭高处阵地上的狙击手。
The RPD's layout is deliberately mirrored after the 1998 Resident Evil 2 design. Several shortcuts Grace opened earlier are still passable. The archive room shortcut and piano room connection are particularly useful. "Letters from 1998" file series (3 letters total) is found exclusively within the RPD — check every desk, shelf, and filing cabinet. These files are among the most emotionally resonant in the entire game.
RPD 内部布局有意参照1998年《生化危机2》的设计。Grace 之前打开的几条捷径仍然可以通行。档案室捷径和钢琴室连接尤其有用。《1998年的信》系列(共3封)仅限在 RPD 内找到——检查每张桌子、书架和文件柜。这些档案是整个游戏中情感共鸣最强的档案之一。
The Orphanage section returns Grace to pure survival horror. Resources are at their scarcest point in the entire game: enter with minimum 15 handgun rounds, 1 First Aid Spray, and a full Blood Collector. Harvest every zombie without exception. The basement of the Orphanage contains Alyssa's Journal Final Entry — this document is required to unlock the alternate ending in Chapter 8. Do not leave without it.
孤儿院段落让 Grace 回归纯粹的生存恐怖。这是整个游戏中资源最匮乏的节点:以至少15发手枪弹药、1瓶急救喷雾和满容量血液采集器进入。无例外地采集每只丧尸的血液。孤儿院地下室有《Alyssa 日记·终章》——解锁第8章隐藏结局需要这份文件。没取到就不要离开。
The city centre plaza is the Super Tyrant's arena. Before entering: use the save station, restock at ammo crates, and ensure your weapon is fully loaded. The arena has good cover positions behind concrete barriers. The Super Tyrant's chest wound is permanently exposed — it is always the primary target. Parry the crouching charge rush, sharpen hatchet immediately, and maintain sustained fire during his stationary windows.
浣熊市中心广场是超级暴君的战场。进入前:使用存档站,在弹药箱补充,确保武器已装满弹。战场有混凝土防护栏后的良好掩体位置。超级暴君的胸部创口永久暴露——始终是主要目标。格挡蹲伏冲锋,立即磨刃斧头,并在他静止的窗口期保持持续射击。
- File: Letters from 1998 (×3) — Exclusive to RPD interior. Found on desks and in filing cabinets throughout the building.
- 档案:1998年的信(×3) — 仅限 RPD 内部。在整栋楼的桌子上和文件柜中找到。
- File: Alyssa's Journal — Final Entry — Orphanage basement. REQUIRED for the alternate "Stop Elpis" ending. Do not miss this.
- 档案:Alyssa 日记·终章 — 孤儿院地下室。"阻止 Elpis"隐藏结局的必要条件。不可错过。
- Safes #3–#5 — Raccoon City holds the most safes. Combinations found in nearby files.
- 保险箱 #3–#5 — 浣熊市保险箱数量最多。密码在附近档案中找到。
Immediately after the decontamination tunnel: turn left to find a green door with a save point inside (use it immediately — this is your ARK safety net). Check the wall monitor for File: N0-AH Status Report. Before going downstairs, look to the right behind the boxes in the corridor — Mr. Raccoon #24 is there. Extremely easy to miss if you proceed directly to the stairs without checking.
穿过净化通道后:立即左转找到一扇带存档点的绿色门(立即使用——这是你的 ARK 安全网)。查看墙上显示器获取档案《N0-AH 状态报告》。下楼前,在走廊箱子后右侧查看——浣熊玩偶 #24 就在那里。如果直接走向楼梯而不检查,极易错过。
After a key computer interaction (cutscene), clear the room and proceed through the door on the right through the Stockroom. The mannequin exhibition room has a disembodied AI voice speaking overhead — this is the N0-AH AI system narrating ARK's research history. Listen carefully: the dialogue contains hints about the final puzzle. Go up the stairs with golden skeleton statues on either side.
关键计算机互动(过场动画)后,清理房间并通过右侧门进入库房。人形模特展览室有脱离肉体的 AI 声音从头顶讲述——这是 N0-AH AI 系统讲述 ARK 的研究历史。仔细聆听:对话包含有关最终谜题的线索。沿两侧有金色骷髅雕像的楼梯上行。
After ascending the skeleton stairs, the first green door on the right leads to the Guest Lounge. Three sequential terminals are interactable here, each yielding a file: Product Catalog 1 (2026), Raccoon City Bioweapon Research Report, and Product Catalog 2 (2026). Mr. Raccoon #23 is behind the third terminal — check carefully after interacting with it.
沿骷髅楼梯上行后,右侧第一扇绿色门通往宾客休息室。这里有三个可交互的连续终端,每个产出一份档案:《产品目录1(2026)》、《浣熊市生化武器研究报告》和《产品目录2(2026)》。浣熊玩偶 #23 在第三个终端后方——与其互动后仔细检查。
Two safes in this section: (1) Sterilisation Chamber Safe — inside a storage crate south of Repository 05. (2) Monitor Control Room Safe — in the northeastern storage pod. Important: a zombie is inside the northeastern pod — kill or lure it out before trying to open the safe. Both combinations change between difficulty modes (Casual/Standard vs Insanity). Check files in the area for the correct codes.
本区段两个保险箱:(1) 净化室保险箱——位于武器库 05 南侧的储物箱内。(2) 监控室保险箱——在东北储物舱。重要:东北储物舱内有一只丧尸——打开保险箱前先击杀或引开它。两个密码在不同难度模式之间变化(普通/标准 vs 狂乱)。查阅区域内的档案获取正确密码。
The Operations Room terminal triggers a critical story cutscene. After the scene: collect the Noblesse Orb from the room (it is impossible to miss — the game directs you to it). This item is MANDATORY for Chapter 8's final puzzle. After collecting it, proceed right through the Stockroom, then into the exhibition room, then upstairs to the Archives. The right-side terminal in the Archives contains File: First Assembly Minutes — essential Elpis lore.
运营室终端触发关键剧情过场动画。动画结束后:从房间收集 Noblesse Orb(不可能错过——游戏会引导你找到它)。这个道具是第8章最终谜题的必需品。收集后,向右穿过库房,再进入展览室,然后上楼去档案室。档案室右侧终端有档案《第一次集会记录》——Elpis 背景的关键内容。
ARK Special Forces are the game's toughest human enemies. They wear full tactical armour with reinforced helmets — headshots require 2–3 handgun rounds, or 1 rifle shot. They work in pairs and alternate between suppressive fire and aggressive flanking. Leon's Body Armor Level 3 is not optional here — two hits from a Special Forces operative at this level without armor can be lethal on Standard difficulty.
ARK 特种部队是游戏中最强的人类敌人。他们穿戴全套带加强头盔的战术装甲——爆头需要2-3发手枪子弹,或1发步枪射击。他们成对行动,在压制射击和积极包抄之间交替。Leon 的三级防弹衣在这里不是可选项——在标准难度下,没有防弹衣的情况下被特种部队打两下可能是致命的。
- Noblesse Orb — Operations Room. CANNOT BE MISSED. Mandatory for Chapter 8 final puzzle.
- Noblesse Orb — 运营室。不可错过。第8章最终谜题必需。
- File: N0-AH Status Report — Wall monitor after decontamination tunnel (before going downstairs).
- 档案:N0-AH 状态报告 — 净化通道后(下楼前)的墙上显示器。
- File: First Assembly Minutes — Right terminal in the Archives. Critical Elpis background lore.
- 档案:第一次集会记录 — 档案室右侧终端。关键的 Elpis 背景档案。
- File: 51st Assembly Minutes — Monitor Control Room (Grace section). Completes the ARK historical record.
- 档案:第51次集会记录 — 监控室(Grace 段)。完整记录 ARK 历史。
- ARK Safe Combinations — Found in files within Repository 05 and surrounding rooms. Change between difficulties.
- ARK 保险箱密码 — 在武器库 05 及周边房间的档案中找到。不同难度之间变化。
The four Operations Room terminals must be activated using the Noblesse Orb and information from earlier files. The order matters — the files collected throughout ARK provide the activation sequence. Incorrect activation order doesn't punish you harshly but does reset partial progress. Grace and Leon converge in ARK's deepest level during this sequence — their first true face-to-face meeting, one of the most significant character moments in the game.
运营室的四个终端必须使用 Noblesse Orb 和之前档案中的信息来激活。顺序很重要——在整个 ARK 收集的档案提供了激活序列。错误的激活顺序不会严重惩罚你,但会重置部分进度。在这个序列中 Grace 和 Leon 在 ARK 最深处汇合——他们真正的第一次面对面,是游戏中最重要的角色时刻之一。
The Super Tyrant returns in a tighter arena with two significant differences: (1) corrosive puddles cover the floor — standing still for more than 3 seconds causes continuous health drain, and (2) multiple structural pillars in the arena provide cover but also obstruct movement. Combat tactics remain identical to the city centre fight. After defeating it, proceed immediately — there is no rest period before Elpis.
超级暴君在更狭窄的战场上复出,有两个重要区别:(1) 腐蚀液覆盖地板——静止超过3秒导致持续掉血,以及 (2) 战场中的多根结构柱既提供掩护也妨碍移动。战斗战术与市中心战斗完全相同。击败它后立即推进——Elpis 前没有休息时间。
Elpis moves quickly across the arena. Its glowing weak point shifts position continuously — track it carefully. Use the Requiem Rifle as your primary damage tool, supplemented by incendiary grenades for burst damage when the weak point is exposed for 2+ seconds. Do not waste ammo firing at non-glowing areas — the damage reduction is severe. Phase 1 ends when Elpis's health drops to approximately 50%.
Elpis 在战场上快速移动。其发光弱点持续改变位置——仔细追踪。使用 Requiem 步枪作为主要伤害工具,当弱点暴露2秒以上时辅以燃烧弹造成爆发伤害。不要浪费弹药射击非发光区域——伤害减少非常严重。当 Elpis 血量降至约50%时阶段1结束。
When Elpis reaches ~50% health, a distinct screen light effect appears. This signals the 10-second Noblesse Orb interaction window. DO NOT continue attacking. Sprint immediately to the Noblesse Orb console and complete the interaction. If you miss this window, Elpis fully restores its health and you must deal it down to 50% again. There is no visual countdown — react to the light effect immediately.
当 Elpis 血量降至约50%时,出现明显的屏幕光效。这标志着10秒 Noblesse Orb 交互窗口的开始。不要继续攻击。立即冲向 Noblesse Orb 操作台并完成交互。如果错过此窗口,Elpis 完全恢复血量,你必须再次将其打至50%。没有视觉倒计时——立即对光效作出反应。
After the Orb interaction, Elpis enters an 8-second full vulnerability state. This is the most important DPS window in the entire game: use every remaining Requiem Rifle round, every incendiary grenade, and every shotgun shell you have. Close range is more effective in Phase 2 — the weak point is now fixed rather than moving. If Phase 2 ends without a kill, resume Phase 1 tactics. After defeating Elpis, the ending choice appears.
Orb 交互后,Elpis 进入8秒全弱点状态。这是整个游戏中最重要的 DPS 窗口:使用所有剩余的 Requiem 步枪子弹、所有燃烧弹和所有散弹枪子弹。阶段2近距离更有效——弱点现在固定而非移动。如果阶段2结束未能击杀,恢复阶段1战术。击败 Elpis 后出现结局选择。
- Insanity Difficulty — Unlocked after any clear. Changed Antique Coin locations, harder enemies, different safe combinations.
- 狂乱难度 — 任意通关后解锁。古董钱币位置改变、更强的敌人、不同的保险箱密码。
- New Game+ — Carry over weapons and upgrades. Antique Coin drops increase significantly on Insanity, making the upgrade path much faster.
- NG+ — 携带武器和升级继续游玩。狂乱难度下古董钱币掉落大幅增加,使升级路径快很多。
- DLC: "Leon Must Die Forever" — Leon-focused post-game content. Available immediately after first clear.
- DLC:"Leon Must Die Forever" — Leon 为中心的通关后内容。首次通关后立即可用。
- Achievement tracker — Unlocks in Challenge Menu after first clear. Shows exactly which achievements remain and from which area.
- 成就追踪器 — 首次通关后在挑战菜单解锁。显示哪些成就仍未完成以及来自哪个区域。